Introduction
Different Program Versions
There are three different versions
of MAKROS:
Makrose.exe/Makros.exe: Independent application (English/German),
Makrosae.exe/Makrosa.exe: ADS application of AutoCAD (English/German),
Makrosarxe.arx/Makrosarx.arx: ARX application of AutoCAD (English/German).
Using makrosarx.exe, data transfer
between AutoCAD and MAKROS is much faster.
Functionality
MAKROS is a program for Finite Element Pre- and
Postprozessing. It may be started as independent application or as an ARX
respectively ADS application to AutoCAD, where it is possible to exchange data
between AutoCAD and MAKROS.
MAKROS offers the following functions:
Creation
of Finite Element ( FE ) models
The creation is done in following steps:
First, a geometry model is created within
AutoCAD or with MAKROS commands. This model uses as few as possible macro
elements to approximate the geometry of the given structure. Within these terms
„macro element’s“ are large elements whose edges may also be spline curves. All
macro elements give the “Macro model” of the structure.
The macro model is transferred to MAKROS if it
is created in AutoCAD.
MAKROS specifies the parameters for the
subdivision of the macro elements into finite elements.
MAKROS calculates the subdivision of the macro
model and creates the finite element model, which may be transferred to
AutoCAD.
With further commands of MAKROS this
finite element mesh can be logically checked and possibly geometrically
modified within AutoCAD or with MAKROS commands.
Additional commands of MAKROS can be used to
assign constraints, loads, element properties and material data.
The resulting FE model can be saved in a text
file using the neutral PATRAN, the NASTRAN or a special interface
specification.
Using command “Load DLL“ it is also possible to
invoke own functions for the generation of nodes and elements.
Interface
between AutoCAD and other processing tools
MAKROS can also be used to translate geometry
data from AutoCAD to other processing tools. AutoCAD data can be read directly
from an AutoCAD session or from a DXF-file. AutoCAD entities are translated to
line, surface or solid elements. Geometrical data can be checked within MAKROS
and possibly be modified by several functions and made available for further
processing within simply structured text files. MAKROS can read most entity
types from AutoCAD. Blocks and polylines composed of line and curved segments
prior must be broken up into basic components by the AutoCAD command „xplode“.
Post
processing
MAKROS offers functions for visualization of
calculation results received from other FE programs.
Invoking
MAKROSARXE, MAKROSAE, MAKROSE
Makrosarxe is loaded as a DLL with the AutoCAD
command ARX/Load, the file “makrosarxe.arx” must then be selected in a file
selection dialog. The DLL can not be unloaded using ARX/Unload, it remains
loaded until AutoCAD is finished. Makrosarxe may also be loaded using the
AutoCAD command (arxload “makrosarxe”).
Makrosae is activated with the AutoCAD command
(xload “makrosae”). Please note the parentheses which must surround AutoLISP
command “xload”. Makrosae can be unloaded with (xunload “makrosae”).
Note: Starting Makrosae or Makrosarxe within
AutoCAD using “xload” respectively “arxload”, AutoCAD needs the location of the
executables and menu definitions of MAKROS. The directory of these files must
be added to the support path of AutoCAD (see AutoCAD menu
Options/Preferences/Environment/Support).
Makrose.exe can be started as a stand alone application, also it can be
associated with several file types and so it can be easily started by double
clicking the relevant file name. Supported file types are:
*.dem: Demo
files for automated run,
*.mes: Binary
macro element structure is loaded and displayed,
*.fes: Binary
finite element model is loaded and displayed.
Commands, switching control between AutoCAD and MAKROS
The invocation of commands within MAKROS is
done by selecting menus on the menu bar of MAKROS.
Each command consists of a single keyword only.
After command invocation an associated dialog box pops up where additional
parameters can be specified. By pressing button “Help” within a dialog box, the
user can become detailed information about the command.
Execution of the command is started by pressing
button “OK”, pressing button “Cancel” will leave the command without execution.
Messages of MAKROS are displayed within the
protocol window of MAKROS. Popup windows are brought up if yes or no answers of
the user are required.
If MAKROS (makrosae or makrosarxe) is loaded
from within AutoCAD, the control of the process is either within AutoCAD or
within MAKROS and only commands given in the currently active program are
executed. With the menu commands “MAKROSA” (“m_makrosa” in the command line of
AutoCAD) respectively “AutoCAD” can be switched between both programs. Giving
the command “MAKROSA” (“m_makrosa”) within AutoCAD, the menu bar within the
MAKROS window will be shown. Commands have then to be selected only within this
menu. All commands given within AutoCAD are delayed. After invoking the command
“AutoCAD” within the menu of MAKROS, this menu bar will be hidden and following
commands only can be given within AutoCAD.
Loading makrosae from AutoCAD, the menu bar of
AutoCAD is automatically expanded by the menu group „MAKROSA“. Loading
makrosarxe the command “m_makrosa” must first be given in the command line of
AutoCAD, then control is transferred to MAKROS and the dialog box of the
AutoCAD command “menuload” pops up, where the AutoCAD menu file “makrosa.mnc”
must be loaded and the menu group “MAKROSA” added to the menu bar of AutoCAD.
The menu group “MAKROSA” has only the menu
point “MAKROSA” that invokes the command “m_makrosa” to transfers control to
MAKROS.
Programming
interface
The
functionality of MAKROS may be expanded by own functions. These functions must
be provided in one or more DLLs. The commands DLL-Function
(see chapter “Commands to generate new nodes and elements” ) and Interface (DLL) (see chapter “Interfaces to
FE-Programs” ) allow to call functions from DLLs. Folder “makrosa/dll” contains
some examples for the development of DLL functions.
Graphical output, OpenGL display lists (layers)
Graphical output is done within a separate
graphics window of MAKROS.
Element models can also be transferred to
AutoCAD and displayed or modified within the active AutoCAD view.
The following information can be visualized:
currently defined macro model
currently defined finite element
model
external element ID’s, group ID’s,
mechanical type ID’s, orientation of the elements etc
specified subdivision of the edges
of the macro elements
external ID’s of the nodes
boundary conditions and loads of the
finite element model
distribution of scalar based results
distribution of vector based results
simulation of dynamically
oscillations
The element model can be displayed as a wire
frame model, a wire frame model that shows only sharp edges and as a surface
model. The surface model can be rendered and shaded. Parts of the model can
have different colors and can be displayed in different layers.
Graphics of MAKROS uses OpenGL functions of
Windows NT and Windows 95 where parts of the graphics are internally stored
within display lists. The use of such display lists makes it possible to vary
aspects of the current view dynamically without a new calculation of the graphics.
This way a high performance in the graphics display can be achieved.
Analogous to the notations within AutoCAD we’ll
use within the following sections the term „layer“ also for these OpenGL
display lists. You can assign different layer IDs to different parts of the
structure and names to these layer IDs, so structural parts can easily be
identified by name. In case a structure is read from AutoCAD all layer
information and layer colors are maintained. The assignments of layers and
layer names will also be saved to hard disk.
In case the structure is plotted within several
layers, it’s also possible to show or hide these layers within OpenGL.
For the definition of the 3D views within the
OpenGL window two dialog boxes are available. With sliders rotation and zooming
of the structure can be done quickly.
Note: For OpenGL graphics the color
palette should be set to „True Color“ (see Windows menu Display/Settings/Color
Palette).
Filenames
Saving the data to hard disk (command “Save”) uses several files with fixed extensions.
These extensions are:
*.mes: binary
file of the macro model
*.mut: binary
file with the data to subdivide the macro elements
*.fes: binary
file of the finite element model
*.efp: ASCII-file
with node coordinates
*.efe: ASCII-file
with element descriptions
*.lqd: binary
file with loads, constraints, element properties and material data
*.pos: binary
file with post processing data
*.ews: saving
of element selection sets
*.btx: saving
of text blocks
*.dem: demo
files
When a filename is required, a file selection
window pops up where an existing file can be selected or a new filename can be
given. The basis name of this given filename is only used, the filename
extension is automatically appended according to the data being saved. Only
files with appropriate extension are shown in the file selection window.
Automatically saving of all data
With the command „Save automatically“ a time increment and a basis name
of the files for automated saving can be given. The basis name is appended by _1 respectively _2 and the filename extension
according to the type of data being saved. Data is saved alternately in files
with expansion _1 respectively _2, so always two copies of different times are
available. Saved are the macro model, the finite element model, subdivision
parameters and load data that is currently in memory. In case of a mistake, you
should turn of the automatically saving immediately, so that a correct saving
is not overwritten.
Parameters are to be given in the following
dialog box:

Change file title: In a file selection box the basis name of the files is to be specified
Time increment: The time increment for automated savings is to be given in minutes. The
time of the latest saving is displayed in the dialog box.
Switch on:
Automatically saving is switched on.
Switch off:
Automatically saving is switched off.
Undo function
Most dialogs, that generate new nodes and
elements, have an „Undo“ button. Recently generated elements are plotted in
yellow and can immediately be deleted by clicking this button, this has to be
done before any other operation is given
Element selection
Commands, that influence only some elements
have the following options for the element selection in the corresponding
dialog box of the command:
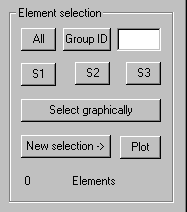
All: All
elements are selected
Group ID:
The elements, that have the group ID given in the input field are selected. If
two group IDs are given, these are interpreted as min- and max ID of an array
of group IDs. If more than 2 IDs are given, these are interpreted as individual
IDs.
S1, S2, S3:
The element selection stored in selection sets S1 – S3 are used.
Select graphically: Clicking this option, you can select elements graphically with cursor.
New selection: Clicking this button, the dialog box for the element selection is
popped up where other options for element selections are given.
Plot:
Selected elements are marked with a symbol, so you can check the selection
graphically.
Graphical
selection of nodes and elements within OpenGL
Several commands have options for selecting
nodes and elements graphically within the OpenGL graphics window.
After selecting such an option all graphically
selectable nodes respectively elements are marked by a colored symbol. This
symbol has then to be selected by cursor.
The graphical selection offers following
methods, the cursor symbol indicates which method is active.
Select individual nodes ( key e ): Multiple nodes can be selected by clicking the
left mouse button. Selection will be ended by pressing right (or middle) mouse
button or pressing the key r
respectively p to alter the
selection method. The cursor symbol is a square.
Rectangular area ( key r ): Opposite corners of a rectangular area should
be marked. All nodes within this area are selected. The cursor symbol is a
corner.
Polygon area ( key p ): All the vertices of a polygon area have to be
marked with the left mouse button. Pressing right button or the keys e respectively r closes the polygon. The polygon is plotted. All nodes within this
polygon are selected. The cursor symbol is a rubber band line.
During a single selection process several
individual nodes or nodes belonging to distinct rectangular areas or polygon
areas can be selected. The selection is ended by pressing the right mouse
button.
The kind of selection can be altered during the
selection process by pressing one of the following keys:
e: Change
to selection of individual nodes
r: Change
to selection of rectangular areas
p: Change
to selection of polygon areas
Key input during the selection process will be
recognized only when input focus is within the graphical window.
When selecting individual nodes the view can be
varied before each selection. If there are more than one selectable point in
the square area around the pointer in case of wire frame plot, this point is
used that is nearest to the cursor position. In case of hidden surface plot,
there may be some invisible points near the pointer, therefor in this case, the
point is used that is nearest to the camera position. Note: If there is no
visible point in the square, an invisible point may be selected. With hidden
surface plot only selection of individual points is allowed.
All selected nodes are marked by a colored
symbol. In case of selecting a node by mistake this selection can be made
undone by immediately pressing key d
when the cursor is within the graphics window and the graphic window has input
focus.
In case of a graphical selection is made active
from within the dialog box for node or element selection the height of the
square area around the pointer can be specified within pixel units in a pop up
window.
External node and element Ids, Node elements
Node and elements get automatically an ID
continuously as the are defined. Using command Sort Ids can explicitly assigned to nodes and
elements. For the assignment of loads, restrictions and properties, the
external Ids are used, for that reason it is preferable to use only Ids
continuously beginning by 1, so that Ids can directly be used as indices. A not
continuos succession of Ids is created, if some nodes or elements are deleted.
By saving the data to a disk file, it is checked whether nodes and element Ids
are continuously beginning by 1. If this is not the case, a warning is shown in
the protocol window. Changing the Ids using command Sort it is checked whether a load file exists and
it is asked whether the used Ids in this file should be adjusted.
For the definition of elements first nodes must
be defined, to these nodes automatically a node element is assigned because
nodes can only be stored in connection with elements. These node elements must
explicitly be deleted if they are no longer needed. Saving the file to disk it
is checked whether node elements exist and a warning is shown.
Demo files, Tutorials
Command sequences of MAKROS can be recorded to
a file and later be reused for demonstration purposes. These demo files use the
extension *.dem.
Several demo files are given on the
installation CD and can be used as tutorials. Running these demos all dialogs
associated with the invoked commands may also be shown with currently used
parameter values. To get more details look up command „Demo file“ in the last chapter.
Demo
installation
MAKROS will be periodically checked against an
available license code provided by a dongle. In case there is no such dongle
available, all the functions of MAKROS can be used without any restrictions,
however no saving of files or transferring of data to AutoCAD is possible.