Postscript: Write graphics to a postscript
file
OpenGL graphics does not support graphics
output to a printer. This command allows creating a postscript file. Multiple
images (up to 6) may be arranged on one single page, the number must be given;
the images are automatically positioned and have equal size if the number is
even.
After specifying the file title and some
parameters, the postscript file is opened and the postscript header is written
by pressing the button „Open file“. Optionally some own postscript commands can
be copied from a given file on top of the postscript file to be created. After
opening, the graphics window is hidden and graphics into the file is done using
the MAKROS graphics commands as usual. Graphic is superimposed until a new image
is selected with button “New image”, For example structure plot, plot of node
Ids and plot of graphic text are done with different commands. For graphic text
the text groups that should be plotted must be set active before. Text height
and color is taken from the chosen font.
Button „Close file“ must be used to close the
postscript file; with button „Printer“ it can immediately be sent to a printer.
If more than one image are arranged on a page, the active image must be
finished and the next image opened by using button „Next image“.
For postscript the window coordinates are
scaled, if some lines or surfaces are only partly visible in the graphics
window these lines and surfaces are not plotted at all, because their
coordinates are not available.
If the used printer does not support color,
grayscale should be used for surface plots. Grayscales can be defined using
command „Post color“. If a black background is used for graphics in the
graphics window grayscales are automatically adjusted for postscript. Color
index 0 is used for white and color index 1 is used for black.
With some kinds of graphics representation it
may be better to make a hardcopy from the graphics window using HyperSnap and
print this copy, for example column plot douse no hidden line calculation.
After invoking the command, the shown dialog
box pops up with following options:
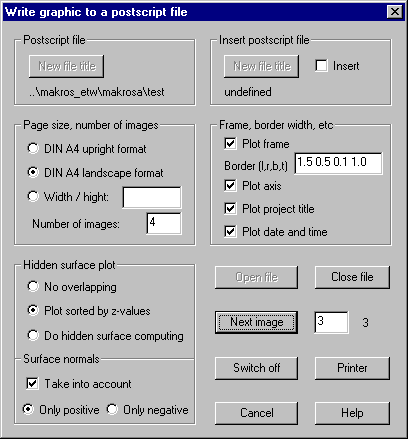
Postscript
file
The
actual title of the postscript file is shown in the dialog, default is
projectname.ps. Using button “New file title” a new file can be selected in a
file selection dialog. The selected file will get the extension .ps.
Insert
Postscript file
If the
option “Insert” is set, the postscript commands contained in the give file will
be copied on the top of the file to be created. Using button “New file title”,
a new file can be selected in a file selection dialog.
Page size,
number of images
DIN A4:
Page size is set to DIN A4 upright format.
DIN A4 landscape format: Page size is set to DIN A4 90° rotated; all images are also
rotated by 90°.
Width / height: Width and height of page size can be given in cm in the input field.
Number of images: The number of images to be positioned on one page can be given in the
input field (£ 6).
Frame,
border width, etc.
Plot frame:
If this option is set, each image will be framed.
Border width: In the input field, the width of the borders on the left, right,
bottom and top of the page can be given.
Plot axis:
With this option set axis are plotted to show the current view.
Plot project title: If this option is set, the project title is plotted on the left of the
top border.
Plot date and time: If this option is set, the date and time of file creation are plotted
on the right of the top border.
Hidden
surface plot
For the
plot of surfaces it is important to know how the surfaces are overlapping each
other. It can be chosen between following options:
No overlapping: This option is fastest, the surfaces are continuously plotted.
Plot sorted by z-values: The surfaces are plotted corresponding to their z-position, surfaces
with lower z-positions at first.
Do hidden surface calculations: This option is most time consuming, a hidden
surface calculation is done by software. The used algorithm assumes that there
are no intersections between surfaces. Pixel coordinates of the actual graphic
are used for hidden surface calculation. To avoid rounding errors the graphic
window should be as big as possible if the structure has lots of small
elements.
Surface
normals
The plot
of surfaces will be less time consuming, if some surfaces can be separated by
the direction of the normal vectors. For example this is the case, if a closed
or a solid structure is plotted where all surfaces on the backside can be
separated.
Following
options can be selected:
Take into account: The normal vectors of the surfaces is checked
Only positive: All surfaces with normals oriented to the back are separated.
Only negative: All surfaces with normals oriented to the front are separated.
Open file
Pressing
this button, a new postscript file with the given title is opened and a new
page is initialized. After that, graphics can be written to this file.
Next image
If more
than one images are positioned on one page, this button has to be used to
initialize the next image, the number of this image has to be given in the
input field. The number of the active image is shown in the dialog.
Close file
Pressing
this button the postscript file is closed and can be sent to the printer.
Switch off
/ on
This
button can be used to interrupt the output to the postscript file, for example
to change and test the view for the next image. When interrupting output to the
file, the graphics window is set visible and following graphics will be shown
in the graphics window. With the same button, which is now labeled “Switch on”
graphics output is newly directed to the postscript file and the graphics
window is hidden again.
Printer
Using
this button, a newly created postscript file can immediately be sent to the
printer. If the file is still opened it will be closed. For printing, there
must exist a file “maka_interface.ini” in the folder of the executable, with
the following line:
Printer:
“printer command”
For
“printer command” the text enclosed in quotation marks must be given to send a
file to the printer, where a % character is the placeholder for the file title,
for example
Printer:
“lpr printername %”
Printer:
“copy % COM2”
The given
text will then be executed as a system command. The file “maka_interface.ini”
is also used for special interfaces (see chapter “Interfaces to FE-Programs“)